.jpg?x-oss-process=image/auto-orient,1/quality,q_100/resize,m_mfit,w_1000,h_1000 "Diesel Heater 12V 5KW LCD Monitor Display 2KW-5KW diesel heater for Van SUV Trucks MotorHome")
.jpg?x-oss-process=image/auto-orient,1/quality,q_100/resize,m_mfit,w_1000,h_1000 "Diesel Heater 12V 5KW LCD Monitor Display 2KW-5KW diesel heater for Van SUV Trucks MotorHome")
.jpg?x-oss-process=image/auto-orient,1/quality,q_100/resize,m_mfit,w_1000,h_1000 "Diesel Heater 12V 5KW LCD Monitor Display 2KW-5KW diesel heater for Van SUV Trucks MotorHome")
.jpg?x-oss-process=image/auto-orient,1/quality,q_100/resize,m_mfit,w_1000,h_1000 "Diesel Heater 12V 5KW LCD Monitor Display 2KW-5KW diesel heater for Van SUV Trucks MotorHome")
.jpg?x-oss-process=image/auto-orient,1/quality,q_100/resize,m_mfit,w_1000,h_1000 "Diesel Heater 12V 5KW LCD Monitor Display 2KW-5KW diesel heater for Van SUV Trucks MotorHome")
.jpg?x-oss-process=image/auto-orient,1/quality,q_100/resize,m_mfit,w_1000,h_1000 "Diesel Heater 12V 5KW LCD Monitor Display 2KW-5KW diesel heater for Van SUV Trucks MotorHome")
.jpg?x-oss-process=image/auto-orient,1/quality,q_100/resize,m_mfit,w_1000,h_1000 "Diesel Heater 12V 5KW LCD Monitor Display 2KW-5KW diesel heater for Van SUV Trucks MotorHome")
.jpg?x-oss-process=image/auto-orient,1/quality,q_100/resize,m_mfit,w_1000,h_1000 "Diesel Heater 12V 5KW LCD Monitor Display 2KW-5KW diesel heater for Van SUV Trucks MotorHome")
.jpg?x-oss-process=image/auto-orient,1/quality,q_100/resize,m_mfit,w_1000,h_1000 "Diesel Heater 12V 5KW LCD Monitor Display 2KW-5KW diesel heater for Van SUV Trucks MotorHome")
.jpg?x-oss-process=image/auto-orient,1/quality,q_100/resize,m_mfit,w_1000,h_1000 "Diesel Heater 12V 5KW LCD Monitor Display 2KW-5KW diesel heater for Van SUV Trucks MotorHome")
.jpg?x-oss-process=image/auto-orient,1/quality,q_100/resize,m_mfit,w_1000,h_1000 "Diesel Heater 12V 5KW LCD Monitor Display 2KW-5KW diesel heater for Van SUV Trucks MotorHome")
.jpg?x-oss-process=image/auto-orient,1/quality,q_100/resize,m_mfit,w_1000,h_1000 "Diesel Heater 12V 5KW LCD Monitor Display 2KW-5KW diesel heater for Van SUV Trucks MotorHome")
.jpg?x-oss-process=image/auto-orient,1/quality,q_100/resize,m_mfit,w_1000,h_1000 "Diesel Heater 12V 5KW LCD Monitor Display 2KW-5KW diesel heater for Van SUV Trucks MotorHome")
.jpg?x-oss-process=image/auto-orient,1/quality,q_100/resize,m_mfit,w_1000,h_1000 "Diesel Heater 12V 5KW LCD Monitor Display 2KW-5KW diesel heater for Van SUV Trucks MotorHome")
.jpg?x-oss-process=image/auto-orient,1/quality,q_100/resize,m_mfit,w_1000,h_1000 "Diesel Heater 12V 5KW LCD Monitor Display 2KW-5KW diesel heater for Van SUV Trucks MotorHome")


Improper placement, poor welds, and other installation mistakes can cause abnormal works from your air heater. In this article, We will show you some guidelines to avoid and then cover the right placement and installation of the air heater. (Take example as MaXpeedingRods 12V 2KW-5KW Diesel Air Heater).
Step1: Punching of fuel tank, installation of oil nozzle(7.5mm drill bit).
Step2: Take out the nozzle and find a wire.
Step3: The wire enters from the perforated position and is removed from the fuel tank opening.
Step4: Fixed nozzle with wire, then pull back and pull the nozzle out.
Step5: Put the seal ring on and secure it with the nut.
Step6: Find the right place and hold it.
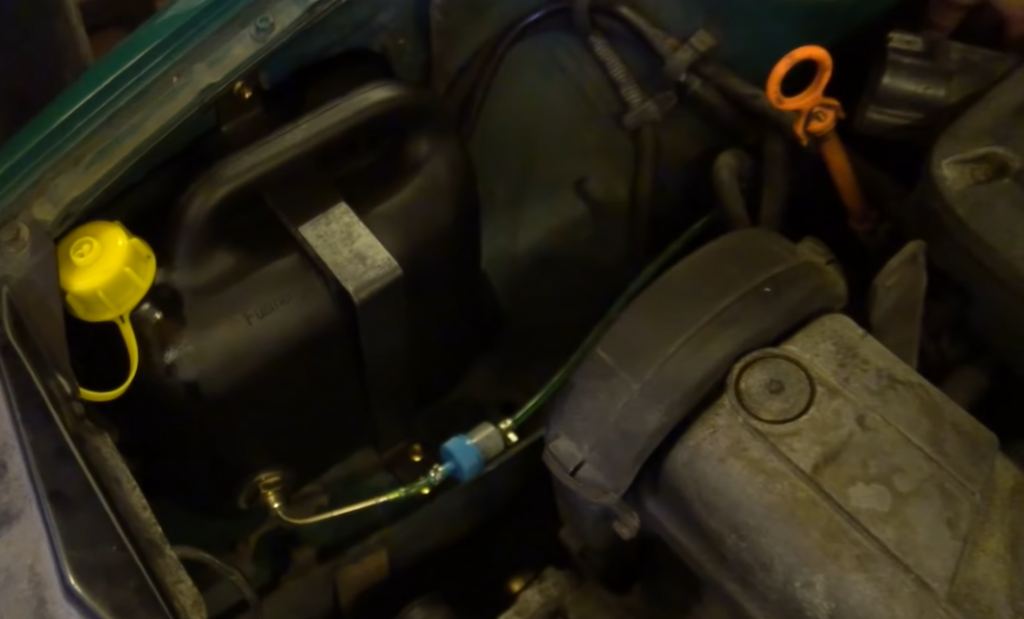
Step7: Cut the tubing joint open.
Step8: Install it on the mouth of the oil tank with a clip.
Step9: Install the oil filter and clamp it.
Step10: Cover the oil pump sleeve well for easy fixing.
Step11: Oil pump installation Angle 45 degrees Angle, oil outlet upward.
Step12: Install the tubing from the tank.
Step13: Take a section of tubing and connect to the tubing connector.
Step14: Install at the outlet of the oil pump.
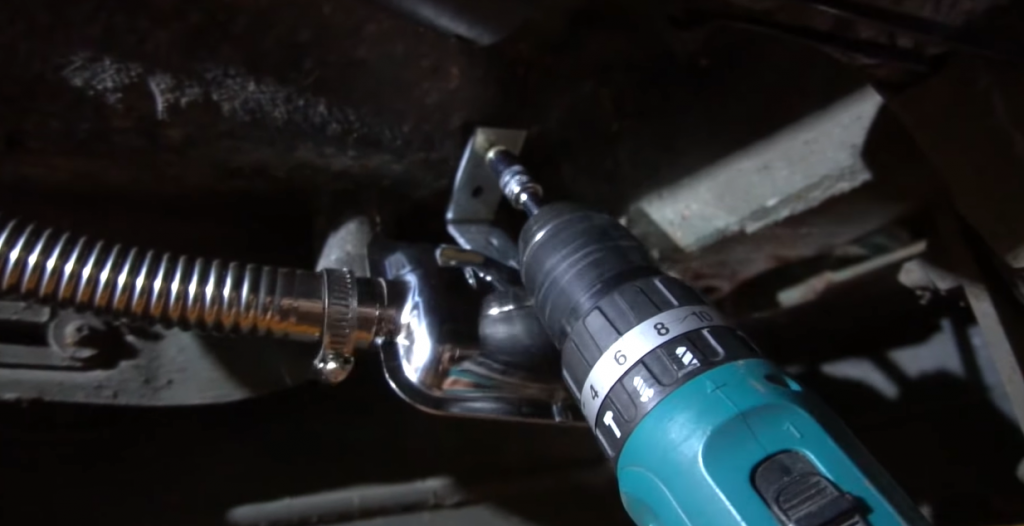
Step15: Take the machine fixing plate and find the appropriate position.
Step16: Mark, punch and secure the holes.
Step17: The heater must be installed horizontally with the exhaust outlet facing down.
Fix the fixed nut.
Step18: The waste pipe mounting clip shall be fixed properly.
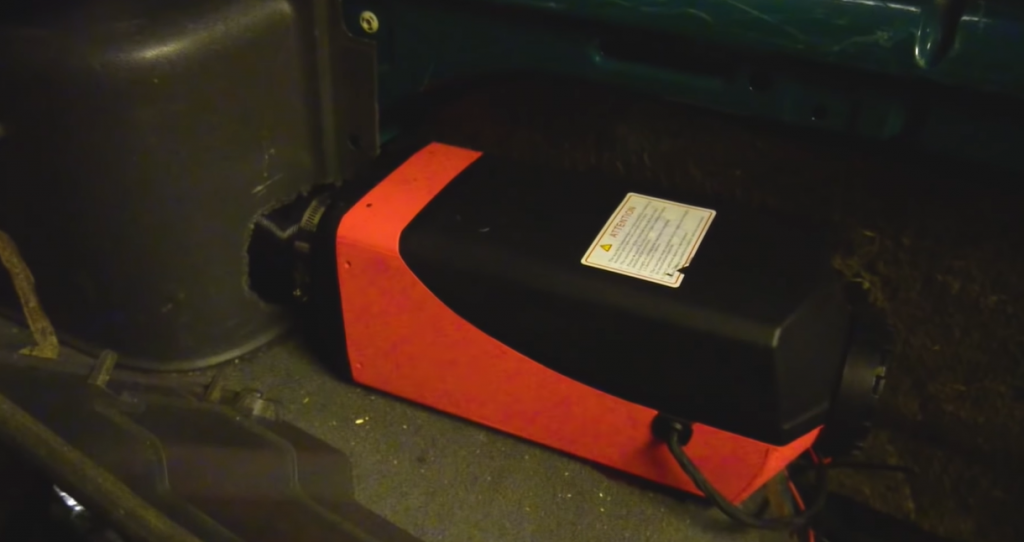
Step19: Install the air inlet pipe and air filter.
Step20: Find the right position to fix.
Step21: The exhaust pipe must be bent towards the rear of the car finding the appropriate position to fix.
Step22: Install the tubing at the pump outlet on the machine.
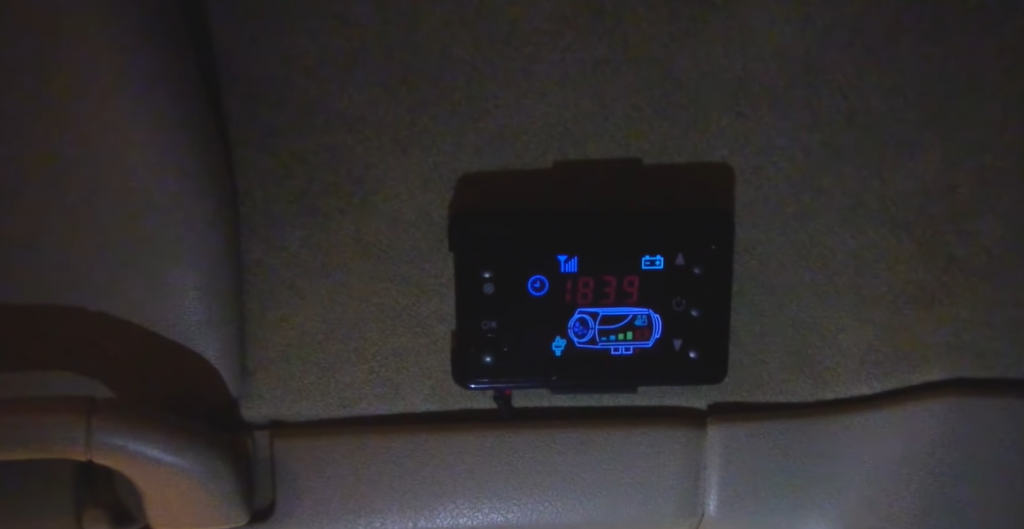
Step23: Connect the wires. Red positive, black negative.
Step24: Remote control to code, in the machine shutdown state.
Step25: Hold down the key and the screen appears(HFR).
Step26: Press and hold the remote control OK key and the power button(3 seconds) to check the code successfully.
Step27: Hold the remote control the power button for 3 seconds to boot.
Oil is needed for the first start.
Step28: Turn the fan on for about 1 minute, and the oil pump start to work.
Step29: The first time it starts, the oil in the tubing is not satisfied.
Step30: If the machine turns for 2-3 minutes, it will shut down automatically.
After the machine shuts down, restart the second time.


.jpg?x-oss-process=image/auto-orient,1/quality,q_100/resize,m_mfit,w_350,h_350 "Diesel Heater 12V 5KW Digital Switch 10LTank diesel heater for Van Lorry Boat Van Thermostat")
.jpg?x-oss-process=image/auto-orient,1/quality,q_100/resize,m_mfit,w_350,h_350 "Diesel Heater 12V 2KW-5KW Remote Control diesel heater for Van Truck SUV Thermostat Motorhome")
.jpg?x-oss-process=image/auto-orient,1/quality,q_100/resize,m_mfit,w_350,h_350 "Air diesel Heater LCD 2KW 12V For Trucks Motorhomes Campervan SUV+App Satrt")
.jpg?x-oss-process=image/auto-orient,1/quality,q_100/resize,m_mfit,w_350,h_350 "12V compatible for AC DC Power Adapter for MaXpeedingrods All in one Diesel Heater")
.jpg?x-oss-process=image/auto-orient,1/quality,q_100/resize,m_mfit,w_350,h_350)
.jpg?x-oss-process=image/auto-orient,1/quality,q_100/resize,m_mfit,w_350,h_350)
.jpg?x-oss-process=image/auto-orient,1/quality,q_100/resize,m_mfit,w_350,h_350)
.jpg?x-oss-process=image/auto-orient,1/quality,q_100/resize,m_mfit,w_350,h_350)
.jpg?x-oss-process=image/auto-orient,1/quality,q_100/resize,m_mfit,w_350,h_350)